


HiDock P1 is an AI-powered voice recorder that supports Bluetooth earphone recording and AI transcription. In this document, we provide a complete guide to set up P1 and introduce its 3 recording modes. Let's go.
To help you set up the device and get onboarded quickly, here is a quick demo video.
Power
P1 has built-in battery. It supports up to 8 hour continuous recording (Room Mode). To power on your P1, please press-and-hold the power button on the left side. You will feel a vibration and the power LED will turn on with WHITE color.

If you connect your P1 with a computer via USB-C cable, it will auto power on.
To power off P1, press-and-hold the power button. If you leave the P1 without any action for 10 minutes, it will auto power off.
The recessed power button design helps prevent accidental presses.
To charge your P1, simply plug the USB-C cable to any computer or phone charger. You can find its battery level from HiNotes. Charging P1 for 10 min will give you 1 hour recording time, fully charge takes about 40-50min.
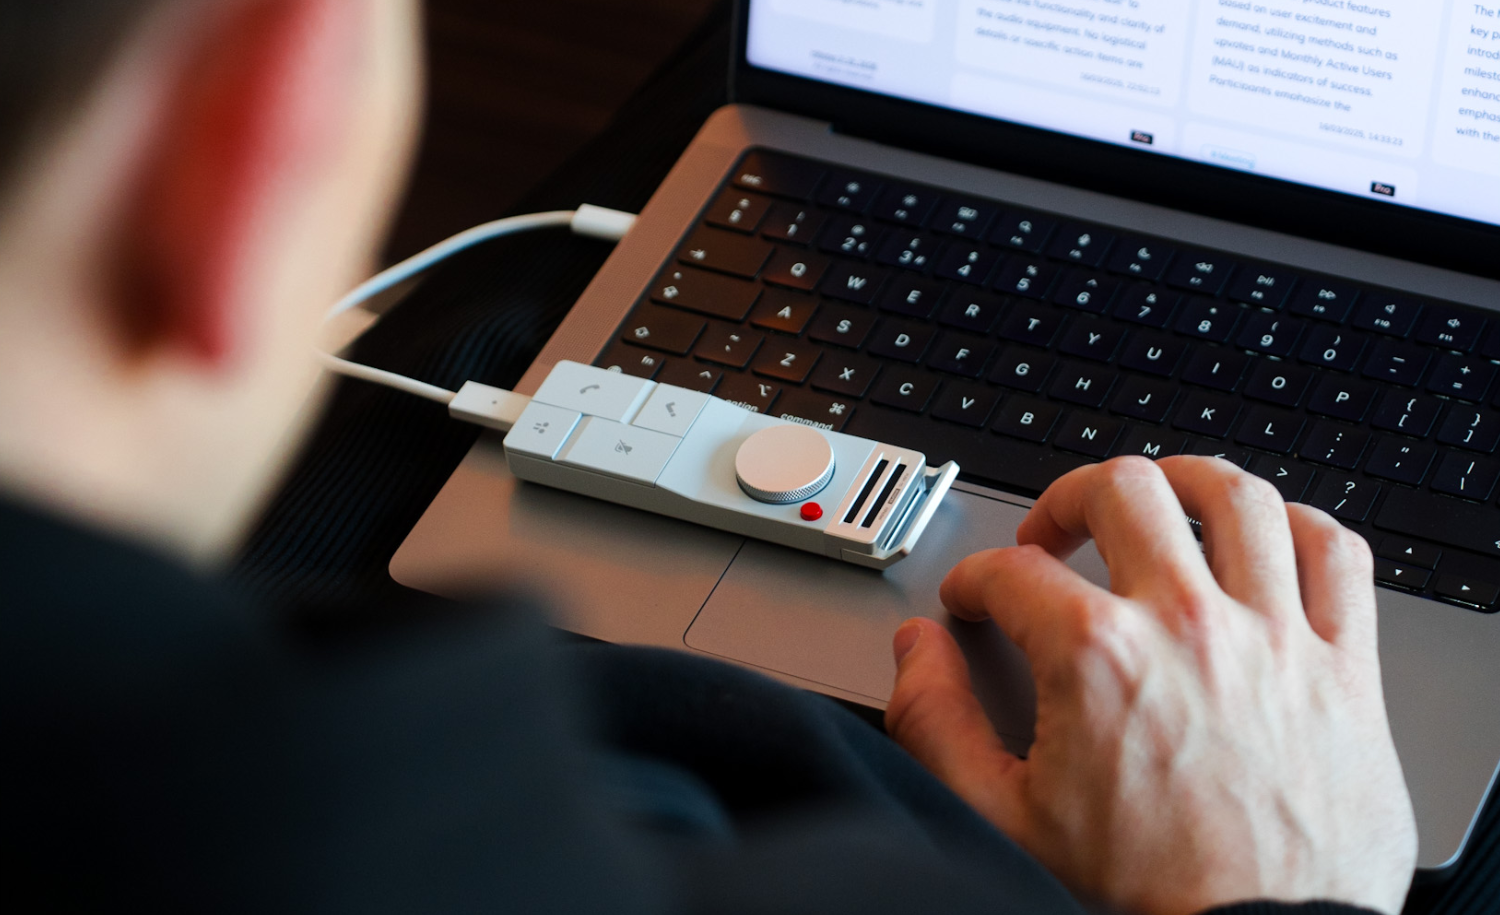
Controls
Below are the common operations for you to use P1 and control meetings, for example, Mute microphone, start recording and tune volume.

HiNotes
HiNotes is the companion app for HiDock devices. It manages devices, recordings and notes.
If you are a HiDock H1 or H1E user, you should already have a HiNotes account. You can directly use P1 without any more actions. If you are new to HiDock, please refer to: https://www.hidock.com/blogs/user-manual/hinotes-quick-guidance
When you connect HiDock P1 to your computer, you will need to follow steps below to associate your P1 to HiNotes:
1. Connect your HiDock P1 to Your Computer via USB-C cable.
2. Open and login the HiNotes app, it will automatically detect and find HiDock P1. Just click Add Device and follow the on-screen instructions.

3. Click Associate.

4. Name your device.

- Input your preferred name for easy identification.
- Choose whether to allow other team members to access recordings from this device.
Enable Access: This allows anyone to view and access recordings on the HiDock P1 across your team, making collaboration easy.
Disable Access: Keep it private for personal use only. This is the recommended setting if you have high security requirements, as it ensures no one else can access your on device recordings.
5. Now you have associated the device to your HiNotes account successfully.

Activate Your Membership
Once your P1 is associated, your HiNotes Membership (including lifetime free transcription) will activate automatically.
Your plan level (Membership or Pro Membership, if applicable) will be shown under HiNotes Profile -> Plans.

If you are a Kickstarter backer, you will find out your Membership is special.

This badge gives you exclusive perks, including:
- Discounted pricing when you upgrade to HiNotes Pro Membership
- Access to early features
Thank you for supporting us from the beginning! ❤️
Firmware OTA Update
We regularly update HiDock device firmware to add new features or resolve issues. Please follow this guide for P1 firmware OTA: https://www.hidock.com/blogs/user-manual/how-to-update-hidock-firmware-from-hinotes
Please be noted that this guide is for HiDock H1, but the experience is very similar with P1.
Recording Management
We recorded a brief video to show you how to manage your recordings, including transcribing and summarize, Please view it on YouTube.
BlueCatch
After you connect your HiDock P1 with HiNotes, you can setup your earphone with BlueCatch, please follow below steps:
PAIR YOUR BLUETOOTH EARPHONES
1. Connect P1 to HiNotes on Your Computer
Ensure that your HiDock P1 is connected to HiNotes App.
2. Go to Device Settings
- Open HiNotes on your computer.
- Navigate to Device > Configuration
3. Initiate Bluetooth Pairing
- Under BlueCatch, click Scan.

- The Ring LED on your HiDock P1 will flash blue and white, indicating it's ready to pair.

4. Put Your Earphones into Pairing Mode
Take AirPods for example, place your AirPods inside the charging case and open the lid.
- For AirPods 4, double-tap the front of the case until the status light flashes white.

- For all other AirPods models, press and hold the setup button on the back of the case until the status light flashes white.

- For other brand earphone model, please refer to this blog or your earphone user manual.
5. Select and Connect Your Earphones
Your earphones will appear in the list within HiNotes.

Choose the earphones you wish to pair and click Connect.

6. Confirmation of Successful Pairing
Once pairing is successful, the earphones name will be displayed in HiNotes.

The Power LED on HiDock P1 will turn BLUE.

You will hear a voice prompt saying "BlueCatch Successful" if you're wearing the earphones.

RECONNECT TO YOUR EARPHONES
Automatic Reconnection
When you turn on HiDock P1 and your Bluetooth earphones are already paired, they will reconnect automatically.
Manual Reconnection
If the connection doesn't happen automatically, short press the BlueCatch Button on P1 to initiate a manual reconnection.

DISCONNECT YOUR EARPHONES
Disconnect Manually
To disconnect your earphones, press-and-hold the BlueCatch Button for 3 seconds. The Ring LED will blink blue 3 times, indicating that P1 is no longer connected.And you will also hear the voice prompt "BlueCatch Release".
Automatic Disconnection
If your earphones are powered off or out of range, HiDock P1 will automatically disconnect after a short period.
Record with 3 Modes
The 3 recording modes are switched automatically, so you don't have to worry about them.

Call Mode
When you connect your P1 to the computer, and successfully BlueCatch your earphone. You are in call mode. You can join Zoom, Microsoft Teams Calls, or use any other applications. Please select HiDock P1 as the microphone and speaker.


Call mode records from your earphone microphone and speaker, so both your voice and the other party's voice are all recorded. Kindly remind you to use the VoiceMark function to note important moments.
Room Mode
When you plug out HiDock P1 from your computer, now you are in Room mode. You can put it on a table, or snap it on a wall. Now you record with P1 microphone, it records the sound within 3 meters (10 ft).

Whisper Mode
Whisper mode is our favorite. You just press-and-hold the wheel, keep talking. It is like the classical push-to-talk phone. It is quick and handy, helps you to catch instant ideas or thoughts.

NOTES: Speak Softly, Not Silently
In Whisper Mode, it's okay to speak gently or tenderly, but avoid whispering without vocal cord vibration. Whispers lack the pitch and sound patterns that automatic speech recognition (ASR) systems rely on to transcribe accurately. For best results, use a quiet, calm voice—but with clear enunciation and natural tone.
Replay
If you want to quickly check recordings, you can double press the wheel. P1 will enter Replay mode and play the latest recording. You can press the Mute and BlueCatch buttons for next/previous navigation. And you can press HiDock/Call buttons for volume up and down.
Tips and skills
With P1 you get HiDock Membership, which include lifetime free transcriptions. It also provides basic AI summaries. If you want to try the Pro Membership, you can apply trial for Pro Membership, as shown below:

When you have technical issues with HiDock devices, the fastest way to get support is to contact us within HiNotes:

Accessories
With P1 package, we provide two accessories, a USB-C cable and a metal plate. They help you to magnetically attach HiDock to the surface of your laptop, and the touch control on the USB-C plug will help you to control meetings. One tap for mute and unmute, press-and-hold for recording (start & stop).

More questions or suggestions
If you have further questions or anything you'd like to share with us, please email: support@hidock.com.

